Reviews on

“Why do I even need a contact form? I can just put my email on the existing Contact Us page.”
You’re not the first person who thought of this. So many people feel the same way when they’re building their website.
And yes, you can just add your email address. But here’s the thing: having a simple contact form is so much better for you and for your visitors.
First, let’s talk about spam. The moment you put your email out in the open, bots and spammers can find it. Before you even know it, your inbox is filled with junk, random promos, and shady messages you never asked for.
That’s exactly what a contact form protects you from. Most forms come with spam filters or CAPTCHA that keep the junk out.
Second, a form makes it super easy for people to reach out. No need for them to copy your email, open their mail app, and hope they typed it right. They can just fill in the form and hit send, done!
If you’ve never set up a contact form before, don’t worry. It’s quick, beginner-friendly, and you don’t need to touch a line of code.
Why Contact Forms Matter for User Experience and Conversions
Having a WordPress contact form might not seem like a big thing at first, but it surely can make a lot of difference in how people feel about your website and whether they actually reach out.
Let me explain how.
- Forms look more professional and organized: Anyone can send an email address on a page, but a clean, well-laid-out form shows you’re serious and ready to help. It feels safer and more trustworthy for your visitors.
- You can guide people with smart fields: A form lets you add helpful things like dropdown menus or checkboxes. For example: “What do you need help with?”
This makes it a lot easier for visitors to share exactly what they need and helps you respond faster. - You get consistent information every time: With a form, you’re not stuck digging through half-finished emails that don’t tell you what you need.
You get the key details up front, like name, email, and what they’re looking for, which cuts down on back-and-forth and keeps your inbox organized.
What You Need Before You Start
You just need a handful of things to get started with setting up a contact form.
- A working WordPress website
If your site is already live, you’re good to go. If not, make sure you have WordPress installed and you can log in to your dashboard. - Your WordPress login details
You’ll need to access your dashboard to install a WordPress contact form plugin and create your form. - A clear idea of what you want in your form
Most contact forms just need the basics like name, email, and a message box. But you can add extras if you want, like a phone number or subject line. - A little bit of time (like 15-20 minutes)
Setting up your first form is quick, but it’s worth taking a few extra minutes to test it and make sure it works perfectly.
cmsMinds is here to help. Our WordPress experts can build, style, and secure your forms so you never miss an important message again.
Best WordPress Contact Form Plugins (Free & Paid)
So, how do you actually make a contact form on WordPress? You’ll need a plugin, and luckily, there are some great ones available that are simply effective.
Here are a few of the most popular options (and yes, they work even if you’re a total beginner):
1. WPForms
One of the easiest plugins for beginners. It has a drag-and-drop builder, so you can create your form without touching any code. There’s a free version that covers all the basics, plus paid plans with extra features if you ever need them.
2. Contact Form 7
This is one of the oldest and most used plugins out there. It’s free and does the job well, but the interface is a bit more technical when compared to WPForms. If you’re okay with a few shortcodes, it works just fine.
3. Ninja Forms
Another beginner-friendly option. It has a clean, easy-to-use builder and lots of add-ons if you want to expand later. You can start for free and upgrade when you need more features.
4. Gravity Forms (Paid)
If you want something more advanced and don’t mind paying for it, Gravity Forms is super powerful. It’s best for bigger sites that need more custom fields and integrations.
Which One Should You Pick?
If you’re new to this, we recommend starting with WPForms. It’s simple, beginner-friendly, and works straight out of the box. You can always try other plugins later if you want more features.
Read More: How to Create a Ninja Form in WordPress
How to Create a Contact Form Using WPForms (Step by Step)
Alright, let’s build your contact form! We’ll use WPForms for this example because it’s super easy, even if you’ve never done this before.
Follow these simple steps:
Step 1: Install and Activate WPForms
First things first, you need to add the WPForms plugin to your WordPress site. And here’s how:
-
Log in to your WordPress dashboard.
This is the admin area where you manage your whole website. Usually, you’ll find it at yourwebsite.com/wp-admin. -
Go to Plugins > Add New.
On the left sidebar, hover over Plugins, then click Add New. This is where you can find and install new plugins for your site. -
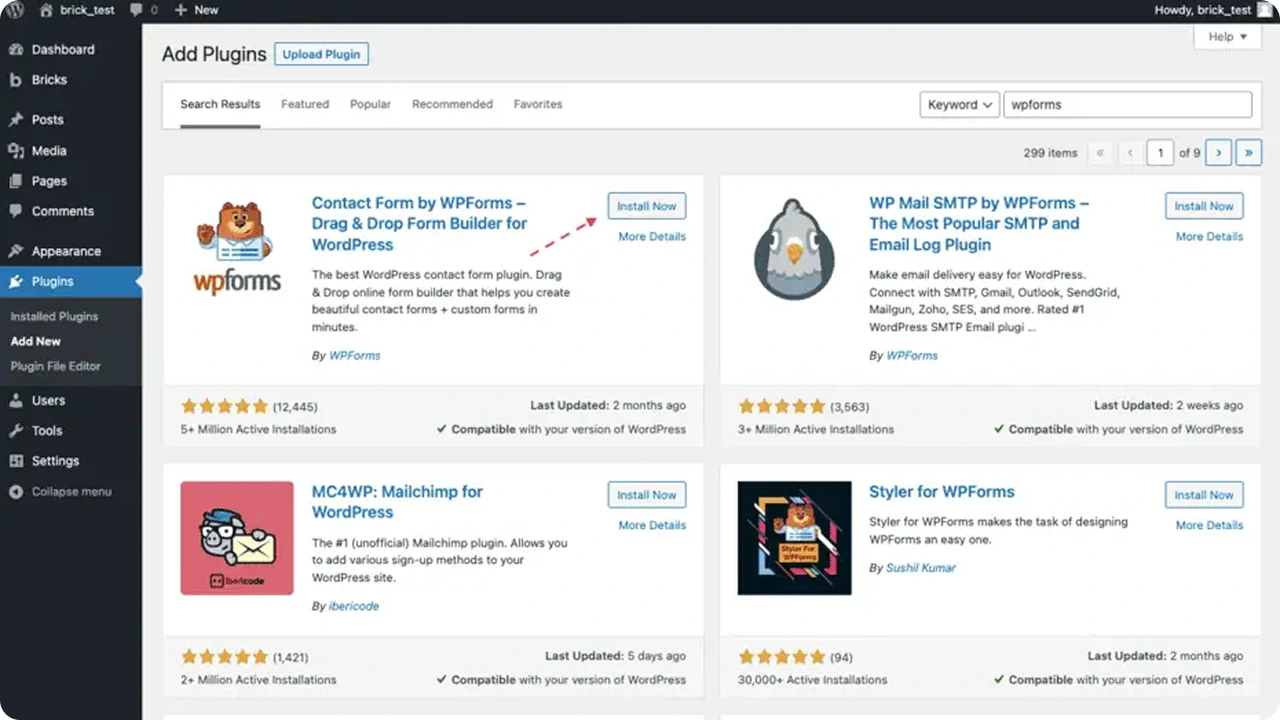
Search for “WPForms”.
In the top-right search box, type “WPForms” and hit Enter. You’ll see WPForms – it usually has a friendly bear logo. -
Click “Install Now”.
Once you find WPForms, click the Install Now button. WordPress will download and install the plugin for you. -
Activate the plugin.
After installation, the Install Now button will change to Activate. Click Activate to turn the plugin on.
That’s it, you’ve just added WPForms to your site! Now you’ll see a WPForms menu option in your WordPress dashboard sidebar.
You’re ready to build your first form!
Step 2: Create a New Form

Now that WPForms is installed and activated, it’s time to create your contact form. Don’t worry, this part is really simple!
- Go to WPForms in your dashboard.
Look at the left-hand sidebar in your WordPress dashboard. You’ll see a new menu item called WPForms. Click on it, then click Add New. - Name your form.
At the top, you’ll see a spot to enter a name for your form. Give it something clear and simple, like “Contact Us Form”. This is just for you – your visitors won’t see it. - Choose a template.
WPForms makes things easy by offering ready-made templates. For most people, the Simple Contact Form template is perfect. It includes the basic contact form details: Name, Email, and a Message field. Click Use Template, and your form will open in the drag-and-drop builder.
That’s it, your contact form in WordPress is now created! Next, you can customize it to suit your needs.
Step 3: Customize Your Form
This is where you make your contact form truly tailored to your business. WPForms makes this whole thing super easy with its drag-and-drop builder.
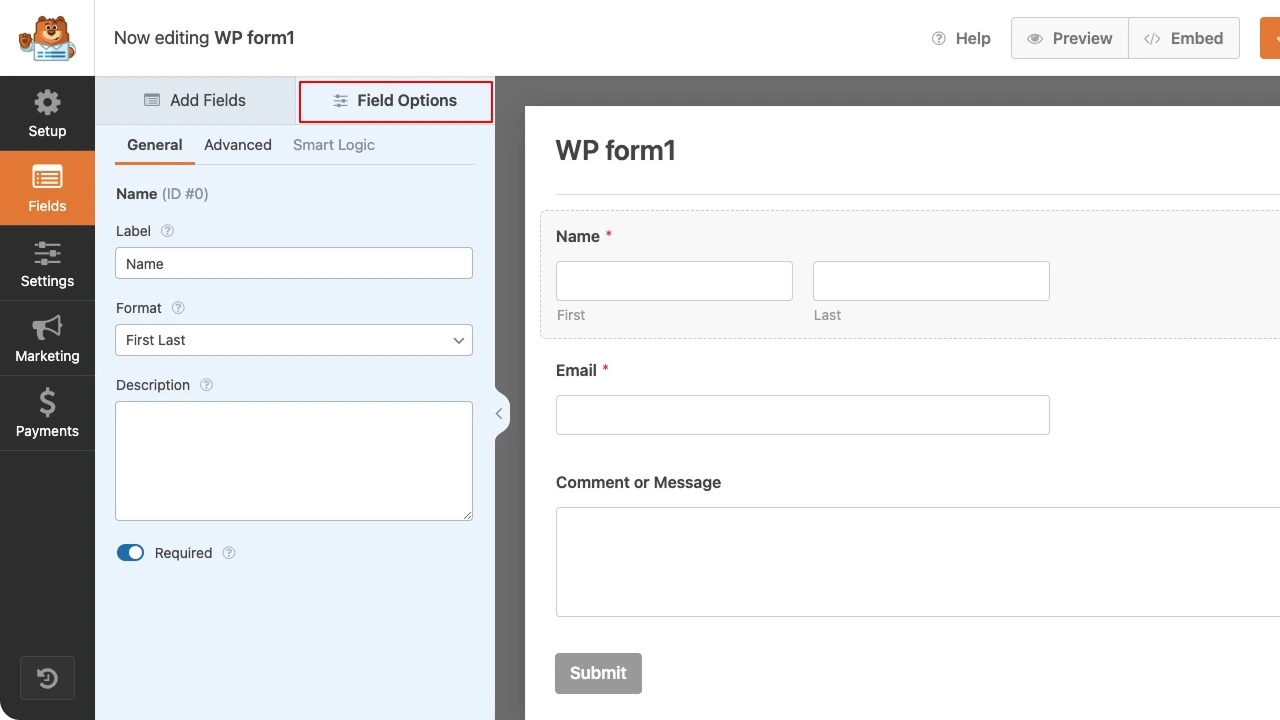
- Look at your form fields
You’ll see the basic fields already there: Name, Email, and a Message box. For many websites, that’s all you need. But you can add more if you want! - Add new fields
On the left side, you’ll see a list of extra fields that you can add, like a Phone Number, a Dropdown, Checkboxes, or even a File Upload.To add one, just drag it from the left panel into your form on the right. - Rearrange fields
Want the phone number above the message box? Just click and drag the fields up or down until they’re in the order you like. - Edit each field
Click on any field to edit its label (for example, change “Message” to “How can we help you?”). You can also make fields required so people don’t skip them. - Delete any fields you don’t need
Hover over a field and click the red trash icon if you want to remove it. - Save your form
When you’re happy with how your form looks, click the big orange Save button in the top-right corner. Better safe than sorry!
Step 4: Set Up Notifications and Confirmations
Your form is built. Now, you want to make sure messages actually get to you and your visitors know their message was sent.
1. Set Up Email Notifications
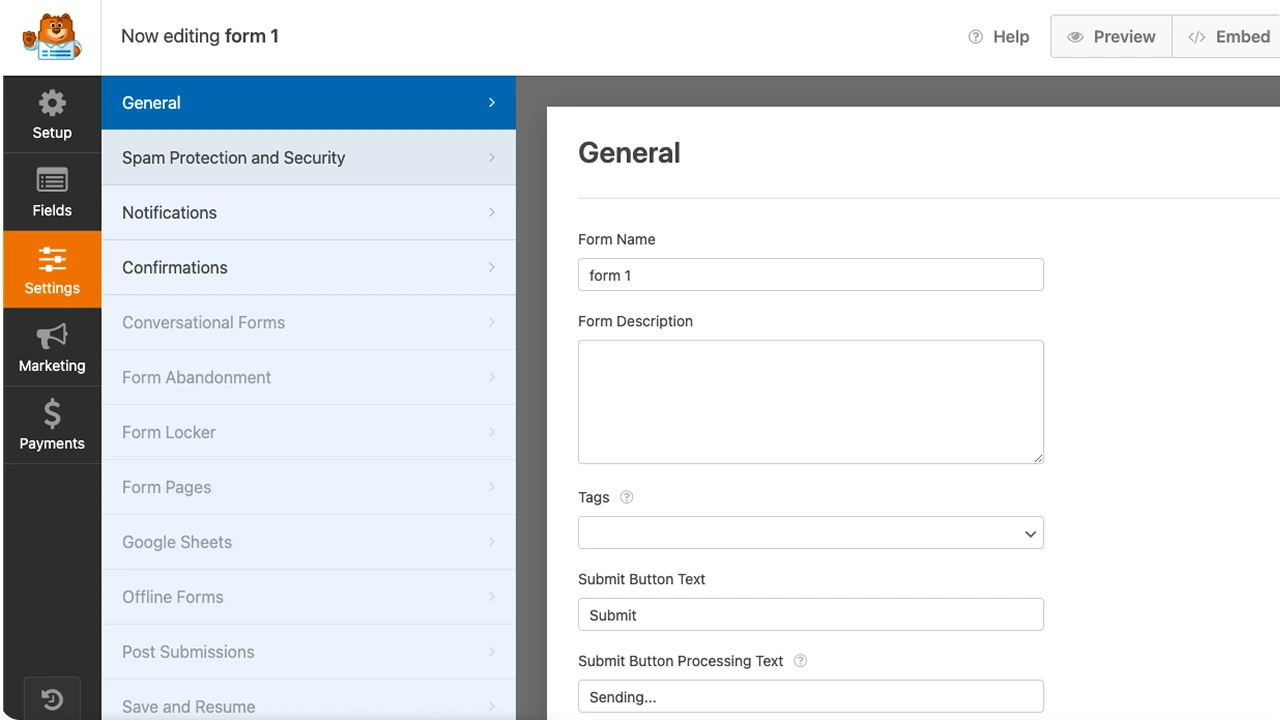
- Go to Settings > Notifications
Inside the WPForms builder, look on the left side and click Settings, then Notifications. - Where should the emails go?
By default, messages will be sent to the admin email you used when you set up WordPress. If you want them to go somewhere else (like a team inbox), change the Send To Email Address field. - Customize the email subject.
You can make your email subject line clear so you know it’s from your website. For example, “New Message from Your Website Contact Form”. - Add more recipients if needed.
Want multiple team members to get the same email? Just separate each email address with a comma.
2. Set Up Form Confirmations
This is the message people see right after they click Submit; it lets them know their message went through.
- Click Settings > Confirmations in the form builder.
- By default, there’s a simple “Thanks for contacting us!” message. You can edit this to make it more personal, like:
“Thanks for reaching out! We’ll get back to you within 24 hours.” - Want to get a little fancy? You can also choose to redirect visitors to a thank-you page on your site instead.
3. Save Everything
When you’re done with your settings, don’t forget to click Save again.
Step 5: Add the Form to a Page or Post
Your form is built, saved, and ready. You can now put it on your website so visitors can use it.
Here’s how to do it:
1. Add Your Form to an Existing Page
- In your WordPress dashboard, go to Pages and find the page where you want the form to appear. For most people, that’s the Contact Us page. Click Edit.
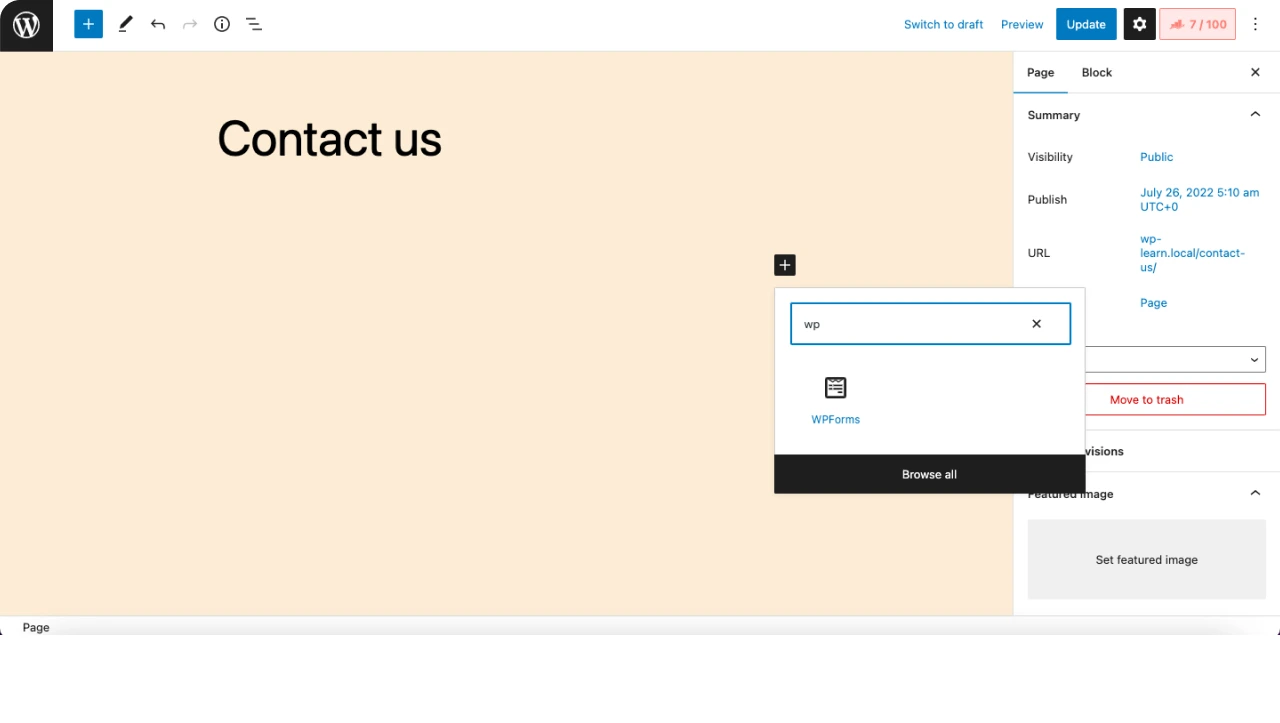
- Inside the WordPress editor, click the + (Add Block) button where you want the form to show up.
- In the search bar, type “WPForms” and select the WPForms block.
- From the dropdown, choose the form you just created (like “Contact Us Form”).
- Click Update or Publish to save your page.
That’s it, your form is now live!
2. Add Your Form to a New Page
If you don’t have a Contact page yet, it’s just as easy:
- Go to Pages > Add New.
- Give your page a title, like “Contact Us.”
- Click the + (Add Block) button and select the WPForms block.
- Pick your form from the dropdown list.
- Add any other content you want, like your address, phone number, or business hours.
- Click Publish to make your new page live.
3. Test Everything
Before you share your page with your customers, check it yourself. Fill out the form, hit Submit, and check that:
- The confirmation message shows up
- The email lands in your inbox
How to Connect Your Contact Form to Other Tools
Your contact form already sends you an email whenever your customers send you a message or reach out by submitting the form. That’s a given.
But do you know that your contact form can do more than just send you an email?
For instance, you can connect the contact form to other tools you already use to save time and stay organized.
Here are a few smart ideas:
1. Connect to Your Email Marketing Service
Want to grow your email list automatically?
Easy!
There are a lot of plugins like WPForms, Ninja Forms, or Gravity Forms that seamlessly let you integrate with popular email marketing services like:
- Mailchimp
- AWeber
- Constant Contact
- ConvertKit
This way, when someone fills out your form and gives permission, they’re added directly to your email list. No manual copy-pasting needed!
How to connect:
- Check your plugin’s “Addons” or “Integrations” tab.
- Install the integration for your email tool.
- Add a checkbox to your form like “Yes, sign me up for updates!”.
- Test it to make sure new contacts show up in your list.
2. Send Notifications to Slack or Your Team
If you don’t want to keep checking your inbox every now and then, you can simply send new form submissions straight to Slack or your team’s project management tool.
Plugins like Trello and Asana will help you do that. This keeps your whole team in the loop without extra emails.
3. Save Form Entries to Google Sheets
Sometimes, it’s just a lot easier to have everything in a spreadsheet.
All you need to do is just link your contact form to Google Sheets so every new message shows up there automatically.
It’s highly handy if you want to keep track of leads, customer requests, or orders, and you won’t have to copy and paste anything by hand.
4. Automate Simple Tasks
If you really want to save time, you can connect your form to other apps you already use.
For example, you can:
- Automatically send a thank-you email when someone submits the form
- Add new contacts straight to your CRM
- Create a support ticket if someone needs help
You don’t have to be a tech pro to do this. Efficient tools like Zapier or Make can help you do this without writing any code.
Tips to Keep Your Contact Form Secure
No doubt, a contact form is super helpful, but it also needs to be secure so you don’t get buried in spam or risk any privacy issues with contact form submissions.
So here are a few quick ways to keep your form safe:
- Use CAPTCHA or honeypot fields
These help block spam bots from flooding your inbox with junk. Most good form plugins have this built in; just turn it on in your form settings. - Keep your plugin updated
Always keep your contact form plugin (and WordPress itself) up to date. Updates often fix security bugs you might not even know about. - Don’t collect unnecessary info
Only ask for what you really need. The less data you store, the less you have to protect, and people appreciate not having to share too much (Trust me on this). - Add a simple privacy notice
If you’re collecting personal info, let people know how you’ll use it. A short line like “We’ll only use your info to respond to your message” is reassuring, or link to your privacy policy if you have one.
Common Contact Form Mistakes to Avoid
It’s just a basic contact form. What could go wrong? Even a simple form can trip you up if you’re not careful.
Here are a few common mistakes to watch out for:
- Not testing the form: Always fill it out yourself before going live. Make sure the confirmation message shows up and the email actually lands in your inbox.
- Forgetting to update your admin email address: If your site is sending messages to an old or wrong email, you’ll never see them! So double-check your notification settings.
- Using too many required fields: People don’t want to fill out a long form just to say hi. Only make the important stuff required, like name, email, and message.
Fixing these small things makes a big difference. Your visitors will have a smoother time, and you won’t miss out on important messages.
Conclusion
That’s it! You have your complete beginner’s guide to creating a contact form in WordPress!
A simple form might not look like a big deal on the outside, but it does a lot for you: it keeps your inbox organized, offers spam protection, makes you look more professional, and helps visitors reach out without any hassle.
Remember, keep it short and clear, test it regularly, and don’t be afraid to tweak it as your business grows.
If you ever want to level up, you can connect your form to other tools, add smart fields, or even automate your follow-ups, but a basic, working form is all you need to get started.
Partner with cmsMinds to get help with contact forms, custom design, security, and everything else WordPress.