Reviews on

If you think websites are only for people who sell online, you couldn’t be more wrong. Whether you run a small business, offer services in your local area, or just want your customers to find you more easily, your business needs a website.
A good business website does more than just tell people what you do; it builds trust, helps you show up in search results, and makes it easy for customers to get in touch with you anytime.
And the best part is you don’t need to hire an expensive developer to create a WordPress website.
With self-hosted WordPress, you’ll have more control, more freedom to customize, and endless ways to grow as your business grows.
In this beginner’s guide, we’ll show you exactly how to create a business website on WordPress, step by step. Right from picking a domain name and hosting plan to designing pages and adding the right plugins, you’ll learn what you need to know.
In this beginner’s guide, we’ll show you exactly how to create a business website on WordPress, step by step. Right from picking a domain name and hosting plan to designing pages and adding the right plugins, you’ll learn what you need to know.
- You don’t need to know how to code to make a business website with WordPress.
- Get a good website name, choose hosting, and plan your main pages like Home, About, and Contact.
- Install WordPress, pick a design you like, and add your text and photos.
- Add a few useful plugins to keep your site safe, backed up, and easy to find on Google.
- When your site is live, share it everywhere and check it now and then to keep it working well.
Choosing the Right WordPress Version (Self‑Hosted vs. WordPress.com)
First, it helps to know that WordPress has two versions: WordPress.com and self-hosted WordPress.org. They’re both WordPress, but they work a bit differently.
WordPress.com is fully hosted for you. It means you don’t have to set up separate hosting or worry about server stuff; WordPress takes care of that. What you can do with your website mostly depends on the plan you choose. Free and cheaper plans have fewer features.
If you want things like plugins, custom themes, or an online store, you’ll usually need a higher plan.
WordPress.org, on the other hand, is actually an information hub. It’s where you can download the free WordPress software and find tons of helpful guides, themes, and plugins.
To use it, you need to set up your own hosting with a provider you choose. This is called self-hosting. Just like WordPress.com, what you can do depends on your hosting plan; better plans usually give you more storage, faster speeds, and extra tools.
Understanding WordPress Plans
When you build a business website with WordPress.com, you’ll need to choose the right WordPress plan that matches what you need now and, of course, what you might want later as your business grows.
So here’s a quick look at what each plan includes:
- Free: Includes a free WordPress.com subdomain (like yourbusiness.wordpress.com), but your site will show WordPress ads and you’ll have limited storage and features.
- Personal: About $4/month (billed yearly). Removes ads and lets you use your own custom domain name, which makes your site look more professional.
- Premium: $8/month (billed yearly). Gives you premium themes, more design tools, and more storage.
- Business: $25/month (billed yearly). A good choice for small businesses that want to install plugins, use advanced SEO tools, and unlock more customization options.
- Commerce: Around $45/month (billed yearly). Adds everything you need for an online store, including WooCommerce and optimized eCommerce hosting.
- Enterprise: Starts at around $25,000/year. This is for large businesses that need custom solutions, extra security, and dedicated support.
Let’s say you’re going with self-hosted WordPress, then you won’t choose from these WordPress.com plans. Instead, you’ll pick a plan from a WordPress hosting provider you trust (Pressable, Automattic, & Bluehost are recommended).
Hosting plans can range anywhere from a few dollars a month for basic shared hosting to more expensive options for managed WordPress hosting with extra help and features.
Talk to the WordPress experts at cmsMinds. We’ll help you get it done right, without the stress.
Pre-Build Setup: Domain, Hosting, & Planning
Once you know which version and plan you’re going with, it’s time to get your basics ready. You can start with your domain name, that’s just your web address (like yourbusiness.com). Try to keep it short, clear, and easy for people to remember.
Next on the list is web hosting. If you’re on WordPress.com, hosting is included in your plan, as you already know. But if you’re self-hosting, you’ll choose your own hosting provider.
Look for one that’s reliable, offers good support, and ideally includes things like a free domain name, a free SSL certificate, and easy WordPress installation. You can also check out their reviews and decide which one to choose.
Finally, do a little planning before you dive in. Think about who your target audience is, what pages you want on your site (like Home, About, Services, Contact), and any extras like a blog page or online store. A bit of planning now makes building your site much easier later.
How to Set Up Your WordPress Business Website (Step-by-Step Guide)
Now that you’ve got your domain, hosting, and plan sorted out, it’s time to actually build your business website. Here’s a simple, step-by-step guide to help you get it done.
Step 1: Install WordPress
If you’re using WordPress.com, you’re all set; you don’t need to install anything.
Just log in, pick your theme, and start customizing your site right away.
But if you’re using self-hosted WordPress, you’ll need to install the WordPress software on your hosting account. The good news is, most hosting providers make this really easy with a one-click install.
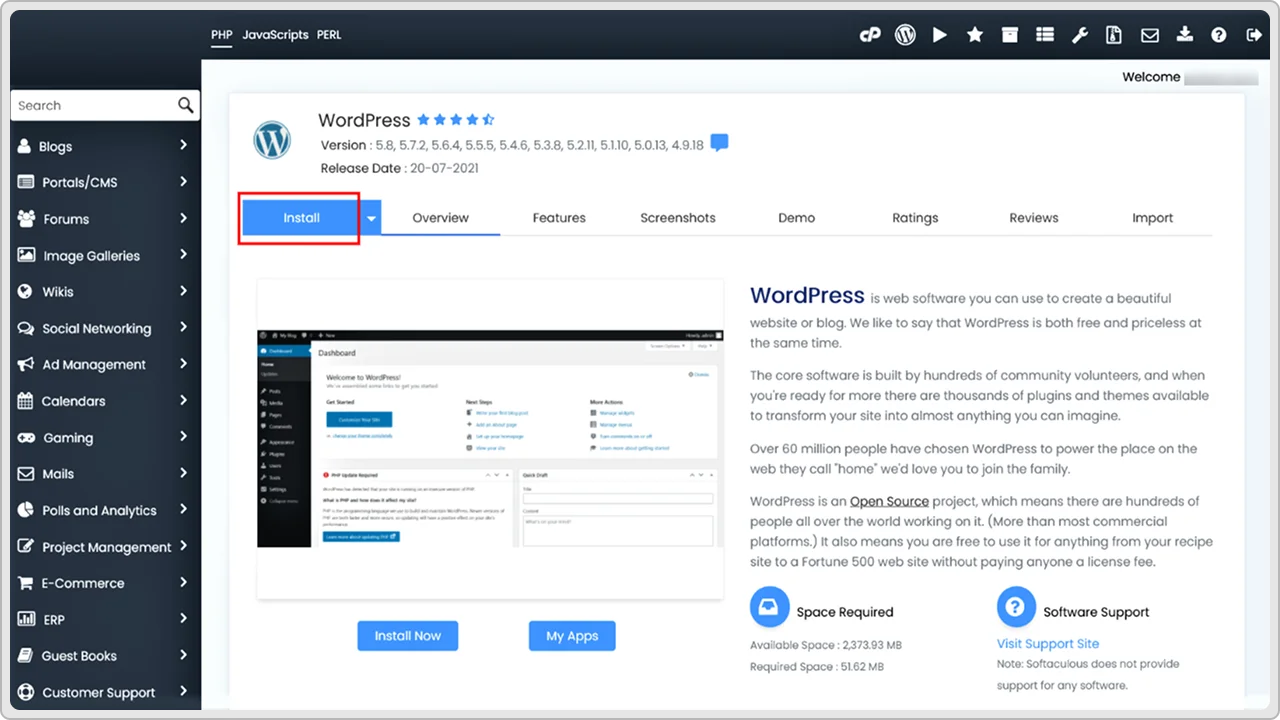
All you have to do is log in to your hosting dashboard (you’ll get these details when you sign up for hosting). Look for the WordPress installer; it might say “Install WordPress” or “One-Click WordPress Install.”
Click it and follow the steps. You’ll usually choose your domain name, create your admin username and password, and that’s it.
When the installation finishes, you’ll get a link to your new website and a login link to your WordPress dashboard (often yourdomain.com/wp-admin). This is your site’s control panel; you’ll use it to add pages, upload images, install plugins, and do all the behind-the-scenes work to keep your site running smoothly.
If you ever get stuck, most hosting companies have tutorials on the resources section of their website or support that can walk you through it in a few minutes.
Step 2: Choose a WordPress Theme
Maybe you’ll enjoy this part- making your website look the way you want!
Your WordPress theme controls your site’s design, layout, and overall vibe. The good news is that there are literally thousands of free and premium themes to choose from, so you’re not stuck with something boring or generic.
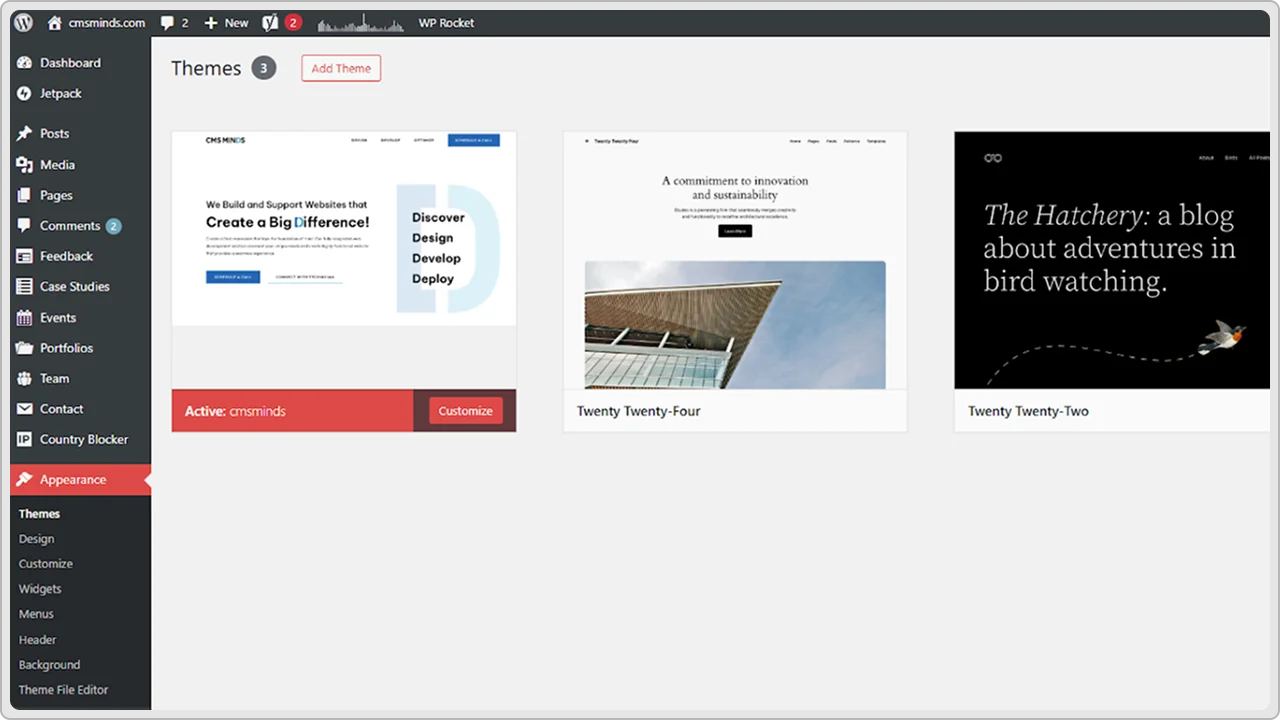
To get started, go to your WordPress dashboard, click on Appearance → Themes, and browse what’s available.
You can either search by style, features, or industry. Look for a theme that’s clean, easy to navigate, and fits your brand’s personality.
What we’d suggest is not to get into the nitty-gritty now. By that, we mean getting every color or image perfect. You’ll have time to do that later.
Right now, the goal is to choose a theme with the overall layout you like.
Once you find it, click Install and then Activate to make it live on your site.
After you activate your theme, you can customize it. Most themes today work with WordPress’s block editor or site editor, which means you can change your header, colors, fonts, and sections without any coding.
Just drag and drop the blocks where you want them.
Step 3: Add Your Essential Pages
Now that you’ve got WordPress installed and your theme activated, it’s time to add the pages your visitors expect to see. This is what makes your site feel complete and trustworthy.
At a minimum, most business websites have these must-have pages:
1) Home Page
This is usually the first thing people see, so make it count. Keep it simple:
- A clear headline that says who you are and what you do.
- A short paragraph or two explaining how you help.
- A call-to-action (like “Get a Quote,” “Book a Call,” or “Contact Us”).
- Maybe a few testimonials or logos of clients you’ve worked with.
2) About Page
People love to know who’s behind a business. Tell your story here:
Who you are
- Why did you start the business
- What makes you different
- Add a friendly photo if you can- it builds trust.
3) Services or Products Page
Explain what you offer.
- Break your services or products into clear sections.
- Use bullet points so it’s easy to skim.
- Add pricing if it makes sense, or a “Get a Quote” button.
4) Contact Page
Make it easy for people to reach you:
- Your phone number & email
- A simple contact form
- Your address (if you have a physical location)
- A Google Map embed if you’re local
Optional Pages: Depending on your business, you might also want:
-
- Testimonials or Reviews
- FAQ Page
- Portfolio or Gallery
- Blog – great for SEO if you plan to share updates or tips.
How to Add a New Page in WordPress
Here’s how easy you can add new pages to your menu:
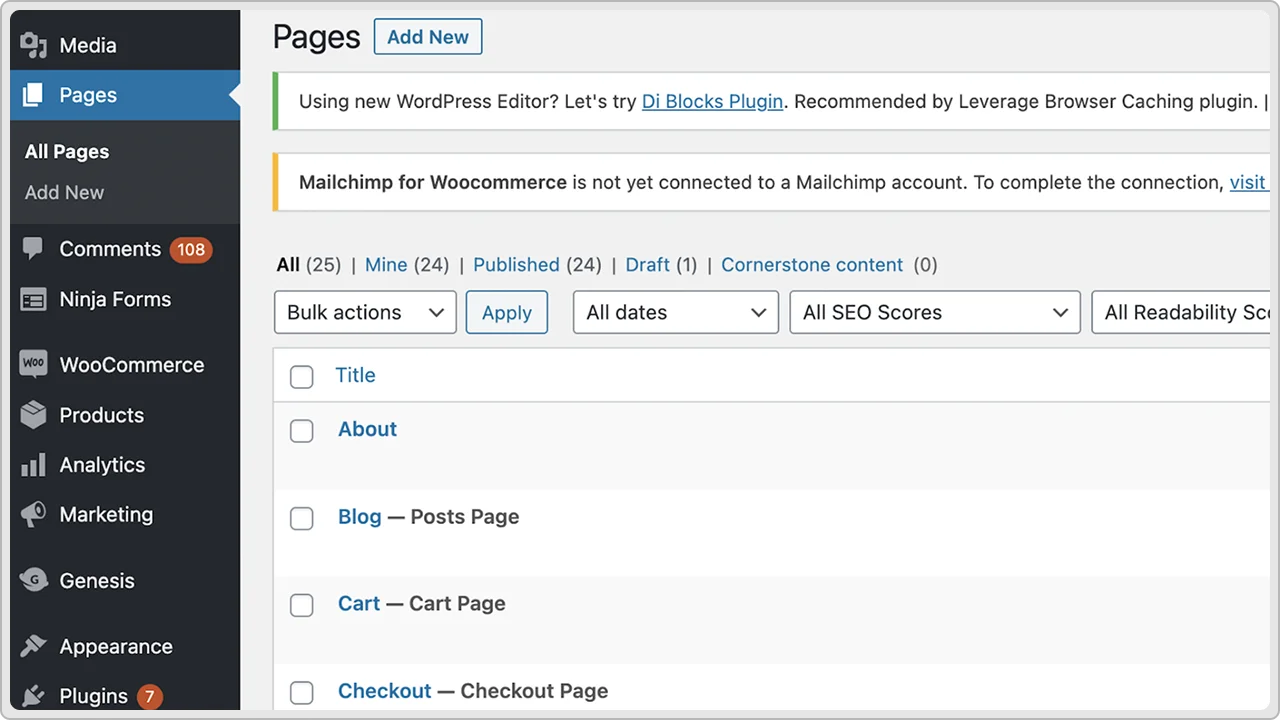
- Log in to your WordPress dashboard.
- Click Pages → Add New.
- Give your page a title (like “About”).
- Add your content using the block editor – text, images, buttons, whatever you need.
- Click Publish when you’re ready to make it live.
Step 4: Create Your Menu & Navigation
Now that you’ve made your main pages, it’s time to set up your website menu.
Your menu is what people (Your customers) use to move around your site. It helps visitors find what they’re looking for quickly, so they don’t get lost or give up.
Remember, a good, clear menu makes your website feel easy to use and professional.
Most small business websites have a simple menu at the top of every page. You don’t need to add every page you’ve ever made; just the important ones people really need.
For example, your menu might have:
- Home – so visitors can always get back to your homepage.
- About – where they learn who you are and what you do.
- Services or Products – so they know what you offer.
- Contact – so they can reach you easily
If you have a Blog, Portfolio, or Reviews page, you can add those too. Just don’t make your menu too crowded, as too many links can feel messy.
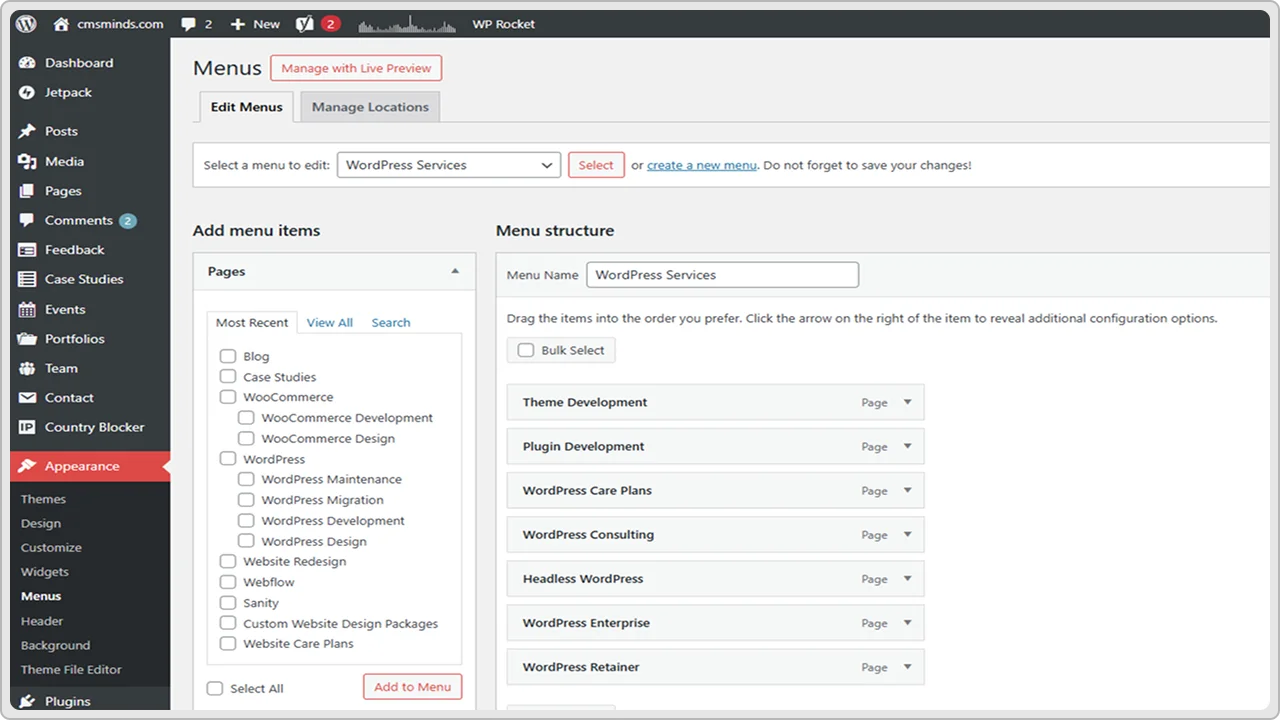
To create your menu, log in to your WordPress dashboard. Go to Appearance → Menus. Click “Create a new menu” and give it a name like “Main Menu.”
This name is just for you, don’t worry, your visitors won’t see it.
Next, you’ll see a list of all the pages you’ve made on the left side. Tick the boxes next to the pages you want, then click “Add to Menu.” The pages you choose will show up on the right side, where you can arrange them.
Now you can simply drag and drop the pages to put them in the order you want. If you want one page to appear under another in a drop-down, just drag it slightly to the right underneath the page above it.
Before you save, look for the Menu Settings box. Tick the box that says “Primary Menu” or “Header Menu” (the exact words depend on your theme). This tells WordPress to show this menu at the top of your site. Then click “Save Menu.”
Once you’re done, visit your WordPress site and test it out, like a customer. Click each link to make sure it works. Look at your menu on your phone too; it should be easy to open and tap.
Most modern WordPress themes automatically make your menu mobile-friendly, but it’s always good to double-check.
If you add new pages later, you can always come back to this menu and add them too. It only takes a minute.
Step 5: Install Must-Have Plugins
Now that your pages and menu are ready, it’s time to make your website more powerful by adding a few important plugins.
What do these plugins do? Well, they are like the little tools or apps that add extra features to your site.
One of the best things about WordPress is that you can add these features without needing to know how to code.
There are thousands of plugins out there (59,000 to be precise), but you don’t need them all. In fact, adding too many can slow down your site. So, it’s better to stick with a few good ones that cover your basic needs.
Most business websites should have these basics:
- Security Plugin – This helps protect your site from hackers and spam.
Good option: Wordfence Security. - Backup Plugin – This keeps a backup copy of your site, so you can restore it if anything goes wrong.
Good option: UpdraftPlus. - SEO Plugin – This helps Google find your website and show it to the right people.
Good options: Yoast SEO or Rank Math. - Contact Form Plugin – This makes it easy for people to send you a message right from your website.
Good option: WPForms or Contact Form 7. - Caching Plugin – This helps your website load faster, which is good for visitors and search engines.
Good option: WP Super Cache or W3 Total Cache.
How to Install a Plugin in WordPress
Installing a plugin is very easy:
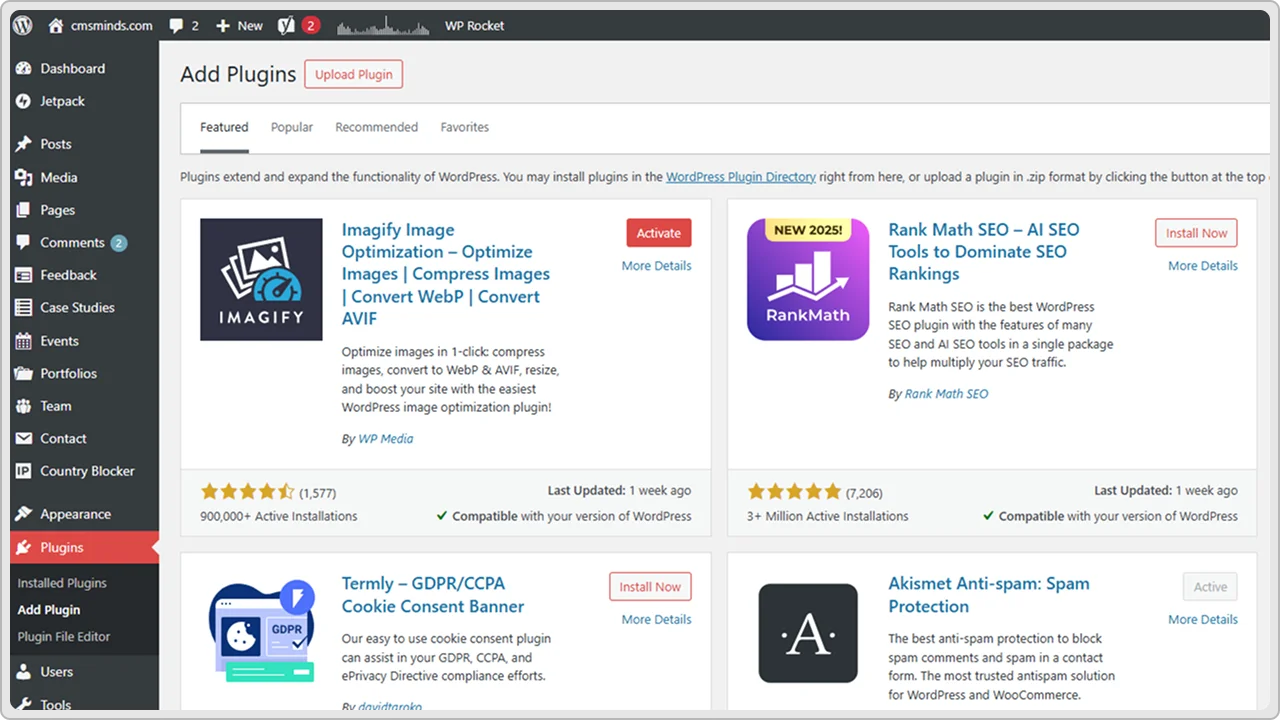
- Log in to your WordPress dashboard.
- Go to Plugins → Add New.
- Type the plugin’s name (like “WooCommerce” or “Yoast SEO”) into the search bar.
- Click Install Now, then click Activate.
That’s it!
Most plugins add a new link in your dashboard where you can set them up.
For example, WooCommerce has a quick setup wizard that helps you add your first products, set shipping and tax options, and connect payment methods like PayPal or Stripe.
Step 6: Customize Your Site and Get Ready to Launch
You’ve got your pages, your menu, and your must-have plugins in place. Your website is almost ready for launch. Next, you’ll want to spend a little time customizing things so your site looks and feels just right for you and your customers.
Consider this step as adding the final touches. You don’t have to make everything perfect, but you do want your site to look clean, easy to use, and true to your brand.
What to Customize
Here are a few simple things to check and adjust before you launch:
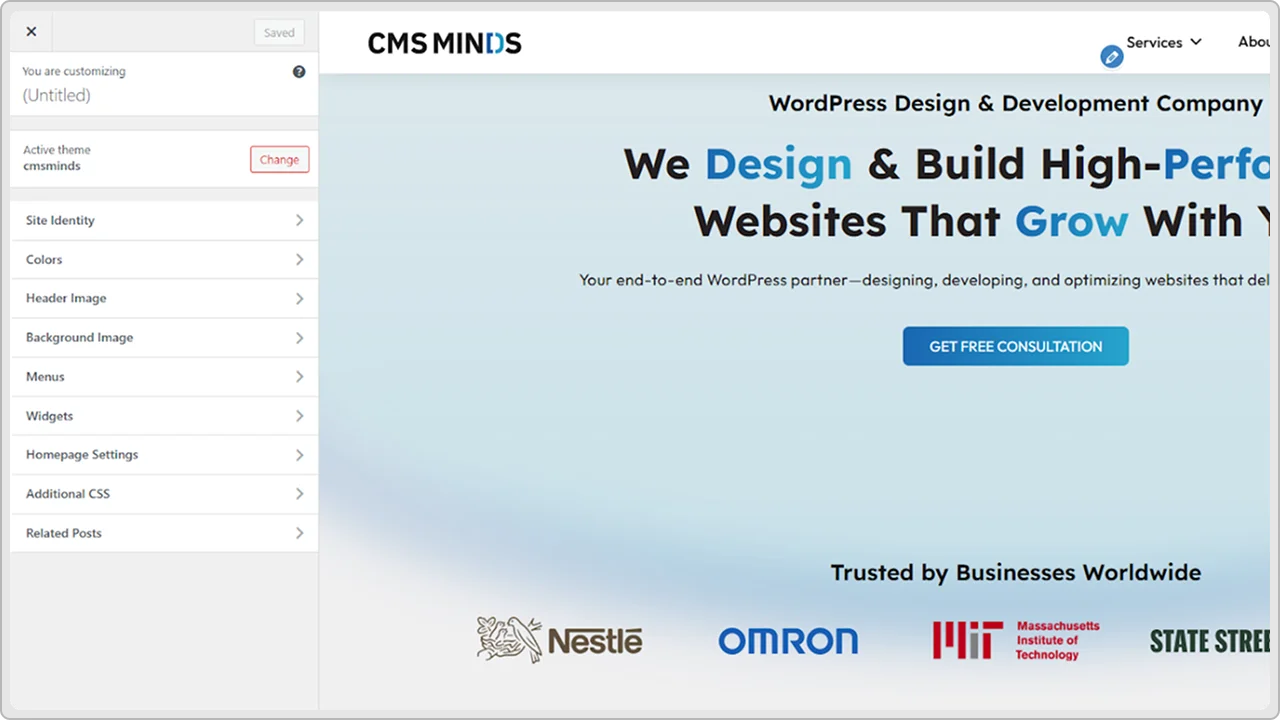
- Site Title and Tagline: These show up at the top of your browser and in search results. You can find this under Settings → General in your dashboard. Keep it short and clear – usually your business name and a short line about what you do.
- Colors and Fonts: Most themes let you choose your brand colors and fonts under Appearance → Customize. Pick colors that match your logo or branding. Keep fonts easy to read – don’t use too many different ones.
- Logo: If you have a logo, upload it in the Customizer. Many themes have a spot just for this.
- Homepage: If you want your homepage to show a specific page (instead of your latest blog posts), go to Settings → Reading and choose “A static page.” Pick your Home page from the list.
- Widgets and Footer: You can use widgets to add things like your contact info, business hours, or social media links to your sidebar or footer. Go to Appearance → Widgets to see what your theme offers.
- Test Everything: Click through all your pages, links, and buttons to make sure they work. Fill out your contact form to be sure you get the email. If you have an online store, do a test order to make sure the checkout works properly.
Next Steps After Launch: Keep Your Site Working and Growing
Launching your website is a big step, so take a moment to be proud of it!
But if you want your website to really help your business, you need to keep it running smoothly and see what’s working well and what could be better. And here’s how you can do it:
Keep Your Website Updated
Your website needs a little care now and then to stay safe and smooth:
- Keep WordPress, your theme, and plugins updated. Updates fix bugs and protect you from hackers.
- Back up your site regularly. Your backup plugin can help with this; just double-check it’s running properly.
- Test things like your contact form or online store once in a while to make sure they still work.
You’ll be able to see things like:
- How many visitors you get
- Which pages are most popular
- Where your visitors come from
- What people do on your site
This helps you make smart decisions. For example, if you see lots of people visiting your Services page, you’ll know it’s worth keeping that page fresh and clear.
How to connect Google Analytics:
It’s pretty simple:
- Create a free Google Analytics account if you don’t have one yet.
- Install a plugin like MonsterInsights (very popular for beginners).
- Follow the plugin’s setup wizard to link your site to your Google Analytics account.
Once you’re connected, you can check your stats anytime right from your WordPress dashboard – super handy!
Essential Details That Make Your Business Website Better
Before you make your wordpress website live to your customers, it’s worth taking a little extra time to check a few small but important things.
These extra steps will make your site look more professional and help everything work the way it should.
1. Use Good Images
Clear, real photos make your website look more trustworthy. So try to use pictures of your actual work, products, or team if you can, cause people like to see the real you.
Also, make sure your images aren’t huge files, so your pages load quickly. When you add an image in WordPress, write a short description in the “alt text” box. This helps people with screen readers and also helps Google understand what your pictures show.
2. Connect Google Search Console
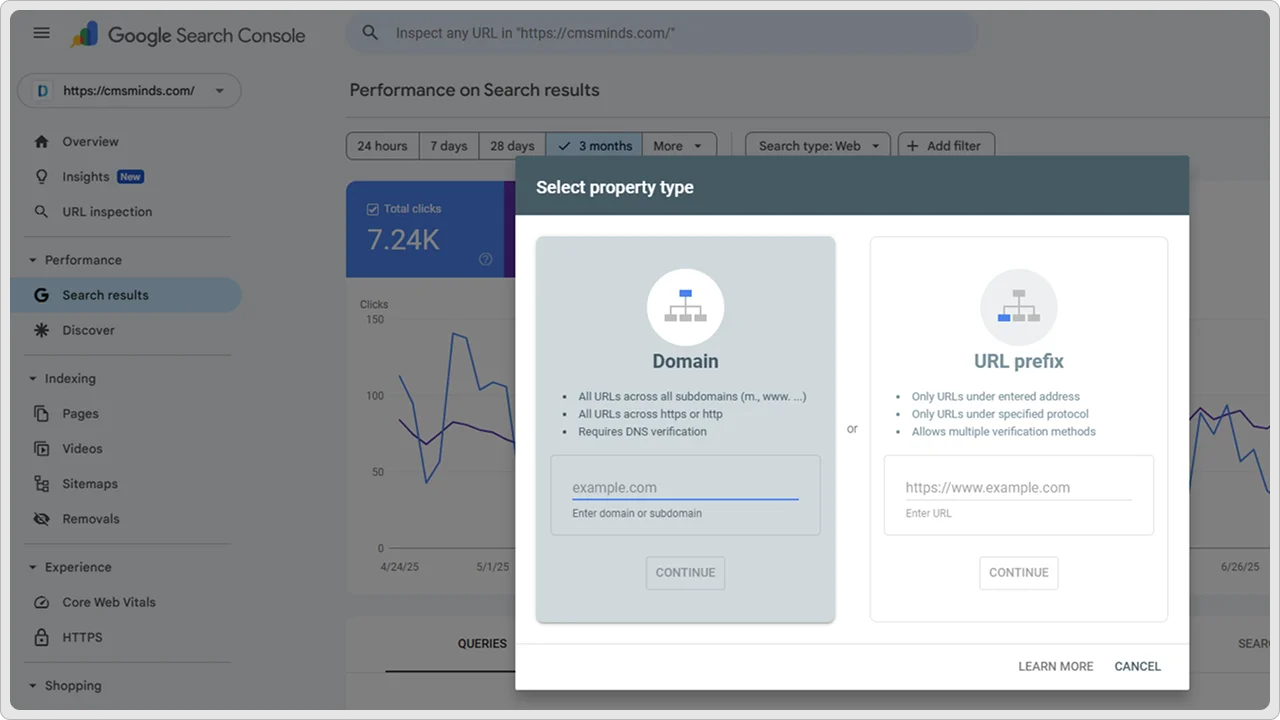
You probably already know about Google Analytics, but Google Search Console is just as useful. It helps you see how your site shows up in Google search results. You can:
- Tell Google about your site so people can find it sooner.
- See what words people type in when they find you.
- Fix problems like broken pages.
It’s 100% free and easy to set up. All you have to do is just sign in with your Google account, follow the steps, and your SEO plugin (like Yoast) can help you connect it.
3. Add Helpful Info in Your Footer

Your website footer is the little area at the bottom of every page. It’s a good place to put important details that your customers might look for, like:
- Your copyright line (for example, © 2025 Your Business Name)
- A few quick links to your main pages
- Your contact info or address
- Social media icons, if you use them
This helps your site look complete and more professional.
4. Add Simple Legal Pages
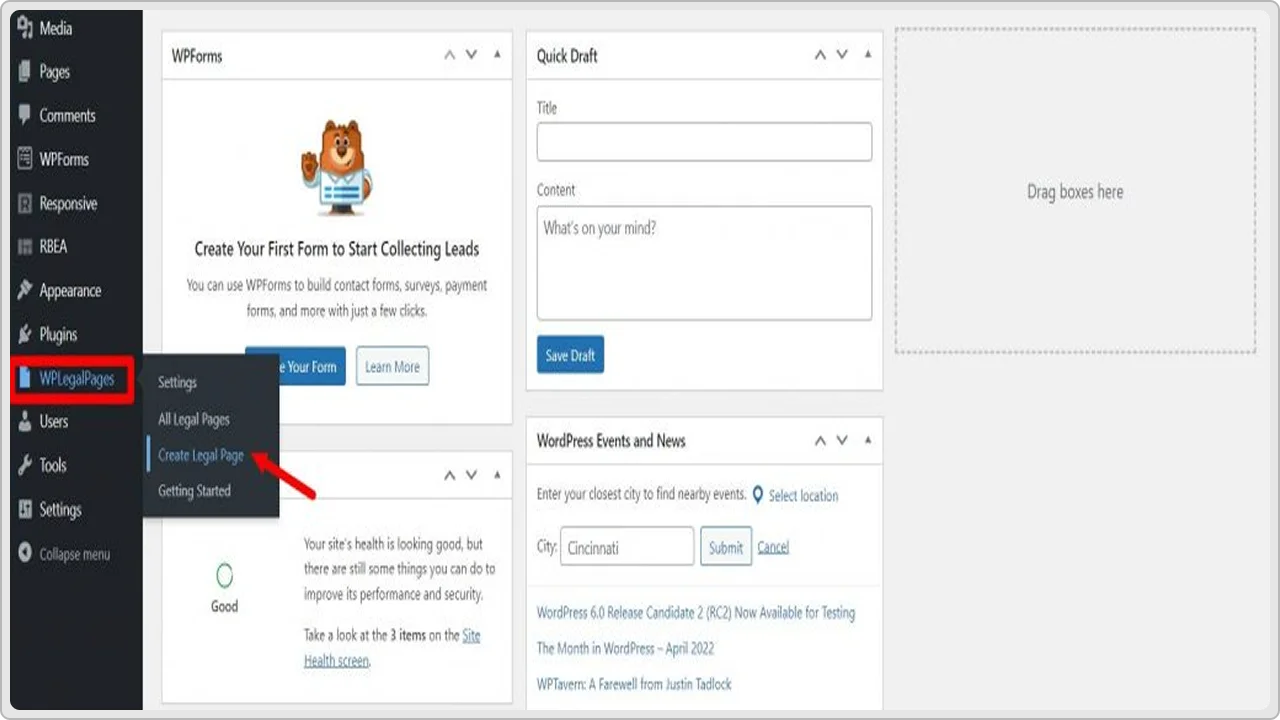
Depending on where you live and what you do, you might need a few basic legal documents. These keep you covered and build trust with your visitors. The main ones to consider are:
- A Privacy Policy that explains what info you collect and how you use it.
- Terms and Conditions if you sell products or services.
- A Cookie Notice if you use tools like Google Analytics.
There are free templates you can find online, or you can use a plugin to help make these pages in minutes.
Know Where to Get Help
Since this is your first time creating a business website on WordPress, it’s quite natural to feel stuck sometimes. You might run into things that don’t work the way you expected, or you might just feel unsure about what to do next, and that’s okay!
The good news is, you don’t have to figure it all out by yourself.
Here are some easy places to get help when you need it:
- Your hosting company’s support team – Most hosting companies have a live chat or a help desk. They’re used to helping beginners every day, so don’t feel awkward asking. They can help you with stuff like backups, logins, setting up your email, or anything that you’re not familiar with.
- WordPress.org forums – The forums are full of questions and answers from people who have been exactly where you are now. Just search for your problem, you’ll probably find that someone else has asked it before.
- Plugin help pages – If something’s not working, check the plugin’s website. Most good WordPress plugins have simple guides, setup steps, or FAQs. Sometimes the fix is right there, you just have to look for it.
- Hire a freelancer for small stuff – If you don’t want to spend hours trying to figure something out, you can always pay a freelancer or a WordPress Website development agency to help. Sites like Fiverr or Upwork make this easy, even for small jobs like fixing an error or changing how something looks.
Conclusion
By now, you know what you need: a domain, hosting, WordPress, pages, a good theme, website content, and the right plugins.
That’s enough to get your site up and working.
Take it step by step. Write what people need to know. Use real photos if you can. Make sure all your links work. Check that your site looks okay on your phone.
When it’s ready, share it with your customers. Put your website on your business cards, your social media, and anywhere else people look you up.
And remember to keep it safe. Save your login somewhere you won’t lose it. Check your site once in a while to make sure it’s still working.
You don’t need it to be perfect; just clear, simple, and useful. That’s enough to help people find you and trust you.
We’ve helped lots of businesses build WordPress sites that just work. If you want some help too, reach out to cmsMinds; we’re happy to walk you through it.