If you’re finding yourself frustrated with the limitations of WordPress and craving a more dynamic, customizable platform, you’re not alone.
Many website owners face the challenge of wanting to elevate their online presence but are held back by the constraints of their current platform. But fear not, because there’s a solution: Webflow!
This innovative platform offers unparalleled flexibility, design freedom, and scalability, making it the ideal choice for those looking to take their website to the next level
Below, we’ve curated step-by-step guide to help you migrate your WordPress site to Webflow, seamlessly.
So, let’s take a closer look at it:
Why Should You Consider Migrating Your Site from WordPress to Webflow?
No matter how well-established WordPress is as a website creation tool, there are some advantages to considering Webflow as an alternative of WordPress. Here’s why you might think about migrating your site:
-
Increased Design Flexibility
Webflow is just way ahead of the competition when it comes to the visual aspect. Though WordPress does take a bit of a slip in needing predefined themes most of the time.
But then there’s more and deeper customization that happens comfortably inside the browser, thanks to the Webflow platform.
In fact, it can be game-changing to make unique, pretty sites without actually digging into the weeds of the code.
-
Streamlined User Experience
Webflow is designed to have a cleaner and more intuitive user interface than WordPress. This makes it much easier to manage content and design on your site, especially for someone who isn’t technically oriented towards Webflow development.
-
Enhanced Performance
Such websites will hence perform faster and just generally better than a standard WordPress setup: the code is optimized, and heavyweight plugins are avoided in the case of a WordPress setup.
Better performance does not only help with user experience, but also in SEO.
-
Hosting that’s Built for Reliability and Scalability
Webflow packages come with hosting, leveraging the reliability and scalability provided by Amazon Web Services.
This spares the complex task of actually making a choice and managing a separate hosting provider required with WordPress alone.
-
Drawn In Security
Webflow has been built with robust security standards, meaning less need for constant monitoring and updating of the latest issues—a concern that often annoys WordPress users.
It gives peace of mind to pay more attention to the aesthetic, content, and functionality of a site than details on the technical vulnerabilities.
A migration to Webflow could be such a strategic move with things like design freedom, user-friendliness, and high website performance at the top of the list.
Essential Preparation that You Need to Do Before WordPress to Webflow Migration
Before we jump straight to the guide, there are some essential things that you need to prepare, first:
Migrating the Design
- Review and Plan Your Design: Before you start with this migration, intend towards your current WordPress design. Think of what it is that you want to preserve and what you might want to refresh. Webflow allows way more control in design, and here are some advanced tools in creating greater interaction, better responsiveness, and beauty.
- Get Expert Help: Given the fact that design cannot be transferred directly from WordPress to Webflow, you would have to pay a Webflow expert to redevelop your current design within the boundaries of the tool, and fully foster its potential for user experience and better site performance.
- Rebuild and Enhance: Duplicate the basic layout of your WordPress website within Webflow, and incrementally add enhancements.Use all the rich design tool sets within Webflow to add that extra layer of custom motion, responsive charm, and optimization for the visuals to look stunning on any device.
Migrating WordPress Content
Creating Visual Assets
- Inventory: Create an inventory of all the visual elements—images, videos, graphics—currently in use on your WordPress site.
- Optimization: These elements can be optimized for the Web without losing a step while they load blazingly quickly on your lovely new Webflow homepage. Basically, this refers to resizing and compressing them and converting them into web-friendly file formats.
- Export: Use media library tools in WordPress to export all the visual stuff and get prepared to manually upload to Webflow.
Content Migration:
- Export Content: Export your texts and all other content you have made to controllable files by plugins like “Export any WordPress data to XML/CSV”.
- Manual Import: As one is not able to import from WordPress directly to Webflow, you will need to make a manual import of content. Create collections in Webflow where you classify your content in the same way you had created in WordPress.
CMS Setup Add Entry:
- Collection Setup: Webflow enables you to set up collections that mirror the structures used in WordPress, such as blog posts or product listings.
- Manual Entry: Content is now manually allocated to these collections. It means that this gives space for the detailed entries of texts, images, and metadata for SEO and user experience.
Final Adjustments:
- SEO and Links: Update internal links and SEO settings to reflect this same structure in Webflow. Migrate all meta titles, descriptions, and keywords while optimizing the same for Webflow settings.
- Responsive Checks: Use all the responsive design features of Webflow to make sure that your content does not lose its beauty on whatever device. Make all such layout adjustments and test it far and wide. Nothing goes to chance.
- Review and Launch: Review content: Scrutinize all migrated content on the site to ensure that it is complete and correct. Check formatting, links, and user experience.
- Testing: Test severely so that everything on your site works before it goes live. Test for speed and responsiveness on devices and browsers.
Getting ready for a WordPress to Webflow migration doesn’t involve technicality only; it rather involves a design approach and a content management strategy.
This is where a person would be put at risk and ensure that the move is great by using some of the powerful design and development tools from Webflow in building an advanced web experience.
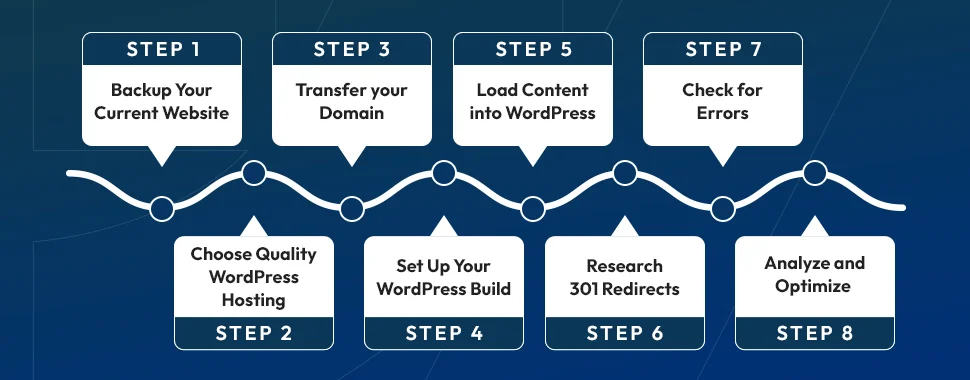
How to Migrate From Webflow to WordPress (in 8 Steps)
Migrating to WordPress from Webflow requires you to take a number of steps so that you maintain your website in one piece and your SEO stays intact during the migration process. In this view, the structured approach involves the following steps:
Step 1: Backup Your Current Website
Back up the whole of your Webflow website before you make any changes. That would be files, images, and database, so for sure you have a fallback in case things go weird in the process of migration.
Step 2: Choose Quality WordPress Hosting
Opt for the best hosting environment for WordPress, as it directly affects the performance and reliability of the site. Factors to be considered are expected traffic, the need for storage, and the location of servers. Choose a hosting service that allows an easy installation for WordPress, as well as offers excellent customer support and maintenance.
Step 3: Transfer your Domain
You will need to point your domain from Webflow to the new WordPress host to keep your current site brand equity and SEO. Typically, this can be done by taking the DNS settings and adjusting them so that the domain points to the new server. This step may take up to 48 hours for complete propagation.
Step 4: Set Up Your WordPress Build
After you are done selecting a hosting service, start installing WordPress. Most of the hosting services have a one-click installation for WordPress.
After installation is complete, browse through the many available themes and choose one that meets your needs in terms of the design or consider a custom theme if you really want it as close to what you did in Webflow.
Step 5: Load Content into WordPress
Even though it is a bit time-consuming, content migration that is done manually is accurate. You’re able to easily export content from Webflow as a CSV file.
Use WordPress plugins, for example, WP All Import, in order to import data on your WordPress site. Categorize your pages, posts, and media files according to the structure you have now in your new site.
Step 6: Research 301 Redirects
Set up 301 redirects for old Webflow URLs to new WordPress URLs so that their SERP rankings are retained and the user experience is not disappointed by unhandled 404 errors.
This is significantly important for maintaining the integrity of old links and possibly preserving some previous link equity.
Step 7: Check for Errors
When your content is imported, run a complete check on your new WordPress website to be sure everything is in its place and there are no serious errors: broken links or images and problems with formatting.
Use Screaming Frog SEO Spider and Error Check software to scan for errors and correct them manually where it is necessary.
Step 8: Analyze and Optimize
This is the stage when websites go live. Measures of the site performance can be made by Google through its tools such as Analytics and Search Console.
Ensure to optimize through caching plugins, image optimization, and minimal CSS and JavaScript for speed. Now, some SEO best practices that will help boost the visibility and ranking of the website.
Conclusion
Migration from Webflow to WordPress describes one of those steps that will unfold the future hosts of websites.
You devise a policy full of the prescribed process, starting from the very backup of the current site to new setup optimization, and you secure such hassle-free website migration in a way that retains the design, content, and functionality of your digital presence.
In the process, literally, these plugins would enhance the functionality of your website with a huge ecosystem of WordPress plugins, thereby providing flexibility in customizing your website in any way that meets the needs of your audiences.
Each step takes you closer to a solid, scalable, and SEO-friendly website that grows with your dreams. After all, a successful migration is all about planning and execution with continued optimization to be ruthless.
Anything but a hurried job, please—take your time to absolutely make sure that each step is done right and that your new project is a reflection of the quality and dedication brought to your audience.
Not only will it run smoothly, but also it will establish a solid foundation for all future improvements and success.


